
| COMPUTER QUIZ (To see correct answers, move mouse over options, answer will be highlighted) |
| 1. Which of the following communication mode supports data transmission in both directions at the same time? a) Simplex b) Duplex c) Half simplex d) Full duplex e) Multiplex 2. Which of the following transmission techniques let computer to alternatively send and receive data? a) Duplex b) Simplex c) Half duplex d) Full duplex e) None of above 3. Modulation is the process of : a) Echoing every character that is received b) Converting digital signals to analog signals c) Converting analog signals to digital signals d) Sending a file from one computer to another computer e) None of above 4. A modem performs- a) Modulation b) Demodulation c) Data compression d) Both (a) & (b) e) All (a), (b) & (c) 5. Which of the following keyboard format is most commonly used? a) TWRITER b) SPLITTER c) QWERTY d) Dvorak e) None of the above 6. The function of key F4 in a word processing application is - a) to repeat the last action b) to open a saved document c) to delete the highlighted text d) to open context menu of highlighted text e) None of above 7. Laser printer is an example of - a) Impact printer b) Inkjet printer c) Non-Impact printer d) Dot-matrix printer e) None of above 8. which of the following is a term related with scanners? a) Laser b) TWAIN c) QWERTY d) Media e) Cartridge 9. The resolution of a monitor depends on: a) Dot pitch of the monitor b) Number of bits representing a pixel c) Number of pixels that can be displayed d) Both (a) & (b) e) All (a), (b) & (c) 10. What does the term ISO stands for? a) Information System Output b) International Standards Organization c) International Systems organization d) Integrated Services Organization e) None of above |
Showing posts with label NETWORKING. Show all posts
Showing posts with label NETWORKING. Show all posts
Friday, 12 October 2012
COMPUTER QUIZ

Sunday, 16 September 2012
Sunday, 2 September 2012
BOOT.INI
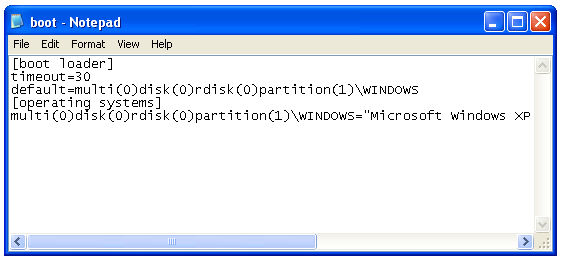
Windows (specifically Ntldr) uses the Boot.ini file to determine which operating system options to display when the Startup program is running. By default, Boot.ini is not flagged as a read-only system file and generally does not require any manual modification.
If you must change the contents of this file, use the System tool in Control Panel:
- Click Start button, click Control Panel, and then double-click System.
- Click the Advanced tab, and then click Settings under Startup and Recovery.
[boot loader]
timeout=30
default=scsi(0)disk(0)rdisk(0)partition(1)\winnt
[operating systems]
scsi(0)disk(0)rdisk(0)partition(1)\winnt = "Windows NT" /NODEBUG C:\ = "Previous Operating System on C:\"
The following list describes the meaning of the data in the Boot.ini file:timeout=30
default=scsi(0)disk(0)rdisk(0)partition(1)\winnt
[operating systems]
scsi(0)disk(0)rdisk(0)partition(1)\winnt = "Windows NT" /NODEBUG C:\ = "Previous Operating System on C:\"
- The "timeout" variable specifies how long Windows waits before choosing the default operating system.
- The "default" variable specifies the default operating system.
- The term "scsi(0)" means that the primary controller (that is frequently the only controller) is responsible for the device. If there are two SCSI controllers, and the disk is associated with the second controller, the controller is named "scsi(1)".
If the system uses IDE, enhanced IDE (EIDE), or Enhanced Small Device Interface (ESDI) drives, or if the system uses a SCSI adapter that does not have a built-in BIOS, replace "scsi" with "multi". - The term "disk(0)" refers to the SCSI logical unit (LUN) to use. This may be a separate disk, but most SCSI setups have only one LUN for each SCSI ID.
- The term "rdisk(0)" refers to physical disk 1.
- The term "partition(1)" is the partition on the first drive in the computer. If there are two partitions, partition C is partition(1) and partition D is partition(2).
- A multi-boot parameter calls for checking the Winnt folder to start from a specified SCSI controller's disk and partition.
- "/NODEBUG" specifies that no debugging information is being monitored. Debugging information is useful only for developers.
- You can add the /SOS option to display driver names while the drivers are being loaded. By default, the OS Loader screen only shows progress dots.
- "Previous Operating System on C:\" implies that the "previous operating system" is MS-DOS, because "C:\" is an MS-DOS path.
NTLDR
NTLDR

(abbreviation of NT loader) is the boot loader for all releases ofWindows NT operating system up to and including Windows XP andWindows Server 2003. NTLDR is typically run from the primary hard disk drive, but it can also run from portable storage devices such as aCD-ROM, USB flash drive, or floppy disk. NTLDR can also load a non NT-based operating system given the appropriate boot sector in a file.
NTLDR requires, at the minimum, the following two files to be on thesystem volume:
- ntldr, the main boot loader itself
- NTDETECT.COM, required for booting an NT-based OS, detects basic hardware information needed for successful boot
An additional important file is boot.ini, which contains boot configuration (if missing, NTLDR will default to \Windows on the first partition of the first hard drive).
NTLDR is launched by the volume boot record of system partition, which is typically written to the disk by the Windows FORMAT or SYScommand.
Sunday, 29 July 2012
Sysinternals Suite
Sys internals Suite
 Download Sysinternals Suite(12465 KB)
The Sysinternals Troubleshooting Utilities have been rolled up into a single Suite of tools. This file contains the individual troubleshooting tools and help files. It does not contain non-troubleshooting tools like the BSOD Screen Saver or NotMyFault.

Download Sysinternals Suite(12465 KB)
Sunday, 22 July 2012
List of F1-F9 Key Cmds 4 cmd prompt
List of F1-F9 Key Cmds 4 cmd prompt
List of F1-F9 Key Commands for the Command Prompt
F1 / right arrow: Repeats the letters of the last command line, one by one.
F2: Displays a dialog asking user to "enter the char to copy up to" of the last command line
F3: Repeats the last command line
F4: Displays a dialog asking user to "enter the char to delete up to" of the last command line
F5: Goes back one command line
F6: Enters the traditional CTRL+Z (^z)
F7: Displays a menu with the command line history
F8: Cycles back through previous command lines (beginning with most recent)
F9: Displays a dialog asking user to enter a command number, where 0 is for first command line entered.
Alt+Enter: toggle full Screen mode.
up/down: scroll thru/repeat previous entries
Esc: delete line
Note: The buffer allows a maximum of 50 command lines. After this number is reached, the first line will be replaced in sequence.
Helpful accessibility keyboard shortcuts
Switch FilterKeys on and off. Right SHIFT for eight seconds
Switch High Contrast on and off. Left ALT +left SHIFT +PRINT SCREEN
Switch MouseKeys on and off. Left ALT +left SHIFT +NUM LOCK
Switch StickyKeys on and off. SHIFT five times
Switch ToggleKeys on and off. NUM LOCK for five seconds
F1 / right arrow: Repeats the letters of the last command line, one by one.
F2: Displays a dialog asking user to "enter the char to copy up to" of the last command line
F3: Repeats the last command line
F4: Displays a dialog asking user to "enter the char to delete up to" of the last command line
F5: Goes back one command line
F6: Enters the traditional CTRL+Z (^z)
F7: Displays a menu with the command line history
F8: Cycles back through previous command lines (beginning with most recent)
F9: Displays a dialog asking user to enter a command number, where 0 is for first command line entered.
Alt+Enter: toggle full Screen mode.
up/down: scroll thru/repeat previous entries
Esc: delete line
Note: The buffer allows a maximum of 50 command lines. After this number is reached, the first line will be replaced in sequence.
Helpful accessibility keyboard shortcuts
Switch FilterKeys on and off. Right SHIFT for eight seconds
Switch High Contrast on and off. Left ALT +left SHIFT +PRINT SCREEN
Switch MouseKeys on and off. Left ALT +left SHIFT +NUM LOCK
Switch StickyKeys on and off. SHIFT five times
Switch ToggleKeys on and off. NUM LOCK for five seconds
Gmail
Note: Must have "keyboard shortcuts" on in settings.
C: Compose new message.
Shift + C: Open new window to compose new message.
Slash (/): Switch focus to search box.
K: Switch focus to the next most recent email. Enter or "O" opens focused email.
J: Switch focus to the next oldest email.
N: Switch focus to the next message in the "conversation." Enter or "O" expands/collapses messages.
P: Switch focus to the previous message.
U: Takes you back to the inbox and checks for new mail.
Y: Various actions depending on current view:
Has no effect in "Sent" and "All Mail" views.
Inbox: Archive email or message.
Starred: Unstar email or message.
Spam: Unmark as spam and move back to "Inbox."
Trash: Move back to "Inbox."
Any label: Remove the label.
X: "Check" an email. Various actions can be performed against all checked emails.
S: "Star" an email. Identical to the more familiar term, "flagging."
R: Reply to the email.
A: Reply to all recipients of the email.
F: Forward an email.
Shift + R: Reply to the email in a new window.
Shift + A: Reply to all recipients of the email in a new window.
Shift + F: Forward an email in a new window.
Shift + 1 (!): Mark an email as spam and remove it from the inbox.
G then I: Switch to "Inbox" view.
G then S: Switch to "Starred" view.
G then A: Switch to "All Mail" view.
G then C: Switch to "Contacts" view.
G then S: Switch to "Drafts" view.
Note: Must have "keyboard shortcuts" on in settings.
C: Compose new message.
Shift + C: Open new window to compose new message.
Slash (/): Switch focus to search box.
K: Switch focus to the next most recent email. Enter or "O" opens focused email.
J: Switch focus to the next oldest email.
N: Switch focus to the next message in the "conversation." Enter or "O" expands/collapses messages.
P: Switch focus to the previous message.
U: Takes you back to the inbox and checks for new mail.
Y: Various actions depending on current view:
Has no effect in "Sent" and "All Mail" views.
Inbox: Archive email or message.
Starred: Unstar email or message.
Spam: Unmark as spam and move back to "Inbox."
Trash: Move back to "Inbox."
Any label: Remove the label.
X: "Check" an email. Various actions can be performed against all checked emails.
S: "Star" an email. Identical to the more familiar term, "flagging."
R: Reply to the email.
A: Reply to all recipients of the email.
F: Forward an email.
Shift + R: Reply to the email in a new window.
Shift + A: Reply to all recipients of the email in a new window.
Shift + F: Forward an email in a new window.
Shift + 1 (!): Mark an email as spam and remove it from the inbox.
G then I: Switch to "Inbox" view.
G then S: Switch to "Starred" view.
G then A: Switch to "All Mail" view.
G then C: Switch to "Contacts" view.
G then S: Switch to "Drafts" view.
Mozilla Firefox Shortcuts
Ctrl + Tab or Ctrl + PageDown: Cycle through tabs.
Ctrl + Shift + Tab or Ctrl + PageUp: Cycle through tabs in reverse.
Ctrl + (1-9): Switch to tab corresponding to number.
Ctrl + N: New window.
Ctrl + T: New tab.
Ctrl + L or Alt + D or F6: Switch focus to location bar.
Ctrl + Enter: Open location in new tab.
Shift + Enter: Open location in new window.
Ctrl + K or Ctrl + E: Switch focus to search bar.
Ctrl + O: Open a local file.
Ctrl + W: Close tab, or window if there's only one tab open.
Ctrl + Shift + W: Close window.
Ctrl + S: Save page as a local file.
Ctrl + P: Print page.
Ctrl + F or F3: Open find toolbar.
Ctrl + G or F3: Find next...
Ctrl + Shift + G or Shift + F3: Find previous...
Ctrl + B or Ctrl + I: Open Bookmarks sidebar.
Ctrl + H: Open History sidebar.
Escape: Stop loading page.
Ctrl + R or F5: Reload current page.
Ctrl + Shift + R or Ctrl + F5: Reload current page; bypass cache.
Ctrl + U: View page source.
Ctrl + D: Bookmark current page.
Ctrl + NumpadPlus or Ctrl + Equals (+/=): Increase text size.
Ctrl + NumpadMinus or Ctrl + Minus: Decrease text size.
Ctrl + Numpad0 or Ctrl + 0: Set text size to default.
Alt + Left or Backspace: Back.
Alt + Right or Shift + Backspace: Forward.
Alt + Home: Open home page.
Ctrl + M: Open new message in integrated mail client.
Ctrl + J: Open Downloads dialog.
F6: Switch to next frame. You must have selected something on the page already, e.g. by use of Tab.
Shift + F6: Switch to previous frame.
Apostrophe ('): Find link as you type.
Slash (/): Find text as you type.
Ctrl + Tab or Ctrl + PageDown: Cycle through tabs.
Ctrl + Shift + Tab or Ctrl + PageUp: Cycle through tabs in reverse.
Ctrl + (1-9): Switch to tab corresponding to number.
Ctrl + N: New window.
Ctrl + T: New tab.
Ctrl + L or Alt + D or F6: Switch focus to location bar.
Ctrl + Enter: Open location in new tab.
Shift + Enter: Open location in new window.
Ctrl + K or Ctrl + E: Switch focus to search bar.
Ctrl + O: Open a local file.
Ctrl + W: Close tab, or window if there's only one tab open.
Ctrl + Shift + W: Close window.
Ctrl + S: Save page as a local file.
Ctrl + P: Print page.
Ctrl + F or F3: Open find toolbar.
Ctrl + G or F3: Find next...
Ctrl + Shift + G or Shift + F3: Find previous...
Ctrl + B or Ctrl + I: Open Bookmarks sidebar.
Ctrl + H: Open History sidebar.
Escape: Stop loading page.
Ctrl + R or F5: Reload current page.
Ctrl + Shift + R or Ctrl + F5: Reload current page; bypass cache.
Ctrl + U: View page source.
Ctrl + D: Bookmark current page.
Ctrl + NumpadPlus or Ctrl + Equals (+/=): Increase text size.
Ctrl + NumpadMinus or Ctrl + Minus: Decrease text size.
Ctrl + Numpad0 or Ctrl + 0: Set text size to default.
Alt + Left or Backspace: Back.
Alt + Right or Shift + Backspace: Forward.
Alt + Home: Open home page.
Ctrl + M: Open new message in integrated mail client.
Ctrl + J: Open Downloads dialog.
F6: Switch to next frame. You must have selected something on the page already, e.g. by use of Tab.
Shift + F6: Switch to previous frame.
Apostrophe ('): Find link as you type.
Slash (/): Find text as you type.
Remote Desktop Connection Navigation
Ctrl + Alt + End: Open the NT Security dialog.
Alt + PageUp: Switch between programs.
Alt + PageDown: Switch between programs in reverse.
Alt + Insert: Cycle through the programs in most recently used order.
Alt + Home: Display start menu.
Ctrl + Alt + Break: Switch the client computer between a window and a full screen.
Alt + Delete: Display the Windows menu.
Ctrl + Alt + NumpadMinus: Place a snapshot of the entire client window area on theTerminal server clipboard and provide the same functionality as pressing Alt + PrintScreen on a local computer.
Ctrl + Alt + NumpadPlus: Place a snapshot of the active window in the client on theTerminal server clipboard and provide the same functionality as pressing PrintScreen on a local computer.
Ctrl + Alt + End: Open the NT Security dialog.
Alt + PageUp: Switch between programs.
Alt + PageDown: Switch between programs in reverse.
Alt + Insert: Cycle through the programs in most recently used order.
Alt + Home: Display start menu.
Ctrl + Alt + Break: Switch the client computer between a window and a full screen.
Alt + Delete: Display the Windows menu.
Ctrl + Alt + NumpadMinus: Place a snapshot of the entire client window area on theTerminal server clipboard and provide the same functionality as pressing Alt + PrintScreen on a local computer.
Ctrl + Alt + NumpadPlus: Place a snapshot of the active window in the client on theTerminal server clipboard and provide the same functionality as pressing PrintScreen on a local computer.
Accessibility
Right Shift for eight seconds: Toggle FilterKeys on and off. FilterKeys must be enabled.
Left Alt + Left Shift + PrintScreen: Toggle High Contrast on and off. High Contrast must be enabled.
Left Alt + Left Shift + NumLock: Toggle MouseKeys on and off. MouseKeys must be enabled.
NumLock for five seconds: Toggle ToggleKeys on and off. ToggleKeys must be enabled.
Shift five times: Toggle StickyKeys on and off. StickyKeys must be enabled.
6.) Microsoft Natural Keyboard with IntelliType Software Installed
Win + L: Log off Windows.
Win + P: Open Print Manager.
Win + C: Open control panel.
Win + V: Open clipboard.
Win + K: Open keyboard properties.
Win + I: Open mouse properties.
Win + A: Open Accessibility properties.
Win + Space: Displays the list of Microsoft IntelliType shortcut keys.
Win + S: Toggle CapsLock on and off.
Right Shift for eight seconds: Toggle FilterKeys on and off. FilterKeys must be enabled.
Left Alt + Left Shift + PrintScreen: Toggle High Contrast on and off. High Contrast must be enabled.
Left Alt + Left Shift + NumLock: Toggle MouseKeys on and off. MouseKeys must be enabled.
NumLock for five seconds: Toggle ToggleKeys on and off. ToggleKeys must be enabled.
Shift five times: Toggle StickyKeys on and off. StickyKeys must be enabled.
6.) Microsoft Natural Keyboard with IntelliType Software Installed
Win + L: Log off Windows.
Win + P: Open Print Manager.
Win + C: Open control panel.
Win + V: Open clipboard.
Win + K: Open keyboard properties.
Win + I: Open mouse properties.
Win + A: Open Accessibility properties.
Win + Space: Displays the list of Microsoft IntelliType shortcut keys.
Win + S: Toggle CapsLock on and off.
Generic
Ctrl + C or Ctrl + Insert: Copy.
Ctrl + X or Shift + Delete: Cut.
Ctrl + V or Shift + Insert: Paste/Move.
Ctrl + N: New... File, Tab, Entry, etc.
Ctrl + S: Save.
Ctrl + O: Open...
Ctrl + P: Print.
Ctrl + Z: Undo.
Ctrl + A: Select all.
Ctrl + F: Find...
Ctrl+W : to close the current window
Ctrl + F4: Close tab or child window.
F1: Open help.
F11: Toggle full screen mode.
Alt or F10: Activate menu bar.
Alt + Space: Display system menu. Same as clicking the icon on the titlebar.
Escape: Remove focus from current control/menu, or close dialog box.
Generic Navigation
Tab: Forward one item.
Shift + Tab: Backward one item.
Ctrl + Tab: Cycle through tabs/child windows.
Ctrl + Shift + Tab: Cycle backwards through tabs/child windows.
Enter: If a button's selected, click it, otherwise, click default button.
Space: Toggle items such as radio buttons or checkboxes.
Alt + (Letter): Activate item corresponding to (Letter). (Letter) is the underlined letter on the item's name.
Ctrl + Left: Move cursor to the beginning of previous word.
Ctrl + Right: Move cursor to the beginning of next word.
Ctrl + Up: Move cursor to beginning of previous paragraph. This and all subsequent Up/Down hotkeys in this section have only been known to work in Rich Edit controls.
Ctrl + Down: Move cursor to beginning of next paragraph.
Shift + Left: Highlight one character to the left.
Shift + Right: Highlight one character to the right.
Shift + Up: Highlight from current cursor position, to one line up.
Shift + Down: Highlight from current cursor position, to one line down.
Ctrl + Shift + Left: Highlight to beginning of previous word.
Ctrl + Shift + Right: Highlight to beginning of next word.
Ctrl + Shift + Up: Highlight to beginning of previous paragraph.
Ctrl + Shift + Down: Highlight to beginning of next paragraph.
Home: Move cursor to top of a scrollable control.
End: Move cursor to bottom of a scrollable control.
Generic File Browser
Arrow Keys: Navigate.
Shift + Arrow Keys: Select multiple items.
Ctrl + Arrow Keys: Change focus without changing selection. "Focus" is the object that will run on Enter. Space toggles selection of the focused item.
(Letter): Select first found item that begins with (Letter).
BackSpace: Go up one level to the parent directory.
Alt + Left: Go back one folder.
Alt + Right: Go forward one folder.
Enter: Activate (Double-click) selected item(s).
Alt + Enter: View properties for selected item.
F2: Rename selected item(s).
Ctrl + NumpadPlus: In a Details view, resizes all columns to fit the longest item in each one.
Delete: Delete selected item(s).
Shift + Delete: Delete selected item(s); bypass Recycle Bin.
Ctrl while dragging item(s): Copy.
Ctrl + Shift while dragging item(s): Create shortcut(s).
In tree pane, if any:
Left: Collapse the current selection if expanded, or select the parent folder.
Right: Expand the current selection if collapsed, or select the first subfolder.
Numpad Asterisk: Expand currently selected directory and all subdirectories. No undo.
Numpad Plus: Expand currently selected directory.
Numpad Minus: Collapse currently selected directory.
Ctrl + C or Ctrl + Insert: Copy.
Ctrl + X or Shift + Delete: Cut.
Ctrl + V or Shift + Insert: Paste/Move.
Ctrl + N: New... File, Tab, Entry, etc.
Ctrl + S: Save.
Ctrl + O: Open...
Ctrl + P: Print.
Ctrl + Z: Undo.
Ctrl + A: Select all.
Ctrl + F: Find...
Ctrl+W : to close the current window
Ctrl + F4: Close tab or child window.
F1: Open help.
F11: Toggle full screen mode.
Alt or F10: Activate menu bar.
Alt + Space: Display system menu. Same as clicking the icon on the titlebar.
Escape: Remove focus from current control/menu, or close dialog box.
Generic Navigation
Tab: Forward one item.
Shift + Tab: Backward one item.
Ctrl + Tab: Cycle through tabs/child windows.
Ctrl + Shift + Tab: Cycle backwards through tabs/child windows.
Enter: If a button's selected, click it, otherwise, click default button.
Space: Toggle items such as radio buttons or checkboxes.
Alt + (Letter): Activate item corresponding to (Letter). (Letter) is the underlined letter on the item's name.
Ctrl + Left: Move cursor to the beginning of previous word.
Ctrl + Right: Move cursor to the beginning of next word.
Ctrl + Up: Move cursor to beginning of previous paragraph. This and all subsequent Up/Down hotkeys in this section have only been known to work in Rich Edit controls.
Ctrl + Down: Move cursor to beginning of next paragraph.
Shift + Left: Highlight one character to the left.
Shift + Right: Highlight one character to the right.
Shift + Up: Highlight from current cursor position, to one line up.
Shift + Down: Highlight from current cursor position, to one line down.
Ctrl + Shift + Left: Highlight to beginning of previous word.
Ctrl + Shift + Right: Highlight to beginning of next word.
Ctrl + Shift + Up: Highlight to beginning of previous paragraph.
Ctrl + Shift + Down: Highlight to beginning of next paragraph.
Home: Move cursor to top of a scrollable control.
End: Move cursor to bottom of a scrollable control.
Generic File Browser
Arrow Keys: Navigate.
Shift + Arrow Keys: Select multiple items.
Ctrl + Arrow Keys: Change focus without changing selection. "Focus" is the object that will run on Enter. Space toggles selection of the focused item.
(Letter): Select first found item that begins with (Letter).
BackSpace: Go up one level to the parent directory.
Alt + Left: Go back one folder.
Alt + Right: Go forward one folder.
Enter: Activate (Double-click) selected item(s).
Alt + Enter: View properties for selected item.
F2: Rename selected item(s).
Ctrl + NumpadPlus: In a Details view, resizes all columns to fit the longest item in each one.
Delete: Delete selected item(s).
Shift + Delete: Delete selected item(s); bypass Recycle Bin.
Ctrl while dragging item(s): Copy.
Ctrl + Shift while dragging item(s): Create shortcut(s).
In tree pane, if any:
Left: Collapse the current selection if expanded, or select the parent folder.
Right: Expand the current selection if collapsed, or select the first subfolder.
Numpad Asterisk: Expand currently selected directory and all subdirectories. No undo.
Numpad Plus: Expand currently selected directory.
Numpad Minus: Collapse currently selected directory.
Windows Hotkeys
Shift + F10 right-clicks.
Win + L (XP Only): Locks keyboard. Similar to Lock Workstation.
Win + F or F3: Open Find dialog. (All Files) F3 may not work in some applications which use F3 for their own find dialogs.
Win + Control + F: Open Find dialog. (Computers)
Win + U: Open Utility Manager.
Win + F1: Open Windows help.
Win + Pause: Open System Properties dialog.
Win + Tab: Cycle through taskbar buttons. Enter clicks, AppsKey or Shift + F10 right-clicks.
Win + Shift + Tab: Cycle through taskbar buttons in reverse.
Alt + Tab: Display Cool Switch. More commonly known as the AltTab dialog.
Alt + Shift + Tab: Display Cool Switch; go in reverse.
Alt + Escape: Send active window to the bottom of the z-order.
Alt + Shift + Escape: Activate the window at the bottom of the z-order.
Alt + F4: Close active window; or, if all windows are closed, open shutdown dialog.
Shift while a CD is loading: Bypass AutoPlay.
Shift while login: Bypass startup folder. Only those applications will be ignored which are in the startup folder, not those started from the registry (Microsoft\Windows\CurrentVersion\Run\)
Ctrl + Alt + Delete or Ctrl + Alt + NumpadDel (Both NumLock states): Invoke the Task Manager or NT Security dialog.
Ctrl + Shift + Escape (2000/XP ) or (Ctrl + Alt + NumpadDot) : Invoke the task manager. On earlier OSes, acts like Ctrl + Escape.
Print screen: Copy screenshot of current screen to clipboard.
Alt + Print screen: Copy screenshot of current active window to clipboard.
Ctrl + Alt + Down Arrow: Invert screen. Untested on OS's other than XP.
Ctrl + Alt + Up Arrow: Undo inversion.
Win + B : Move focus to systray icons.
Shift + F10 right-clicks.
Win + L (XP Only): Locks keyboard. Similar to Lock Workstation.
Win + F or F3: Open Find dialog. (All Files) F3 may not work in some applications which use F3 for their own find dialogs.
Win + Control + F: Open Find dialog. (Computers)
Win + U: Open Utility Manager.
Win + F1: Open Windows help.
Win + Pause: Open System Properties dialog.
Win + Tab: Cycle through taskbar buttons. Enter clicks, AppsKey or Shift + F10 right-clicks.
Win + Shift + Tab: Cycle through taskbar buttons in reverse.
Alt + Tab: Display Cool Switch. More commonly known as the AltTab dialog.
Alt + Shift + Tab: Display Cool Switch; go in reverse.
Alt + Escape: Send active window to the bottom of the z-order.
Alt + Shift + Escape: Activate the window at the bottom of the z-order.
Alt + F4: Close active window; or, if all windows are closed, open shutdown dialog.
Shift while a CD is loading: Bypass AutoPlay.
Shift while login: Bypass startup folder. Only those applications will be ignored which are in the startup folder, not those started from the registry (Microsoft\Windows\CurrentVersion\Run\)
Ctrl + Alt + Delete or Ctrl + Alt + NumpadDel (Both NumLock states): Invoke the Task Manager or NT Security dialog.
Ctrl + Shift + Escape (2000/XP ) or (Ctrl + Alt + NumpadDot) : Invoke the task manager. On earlier OSes, acts like Ctrl + Escape.
Print screen: Copy screenshot of current screen to clipboard.
Alt + Print screen: Copy screenshot of current active window to clipboard.
Ctrl + Alt + Down Arrow: Invert screen. Untested on OS's other than XP.
Ctrl + Alt + Up Arrow: Undo inversion.
Win + B : Move focus to systray icons.
Saturday, 21 July 2012
Basics of telnet
Basics of telnet
Learning Telnet
::Don't use this for illegal stuff::
Introduction:
Telnet is used to connect to remote machines through emulation. This means that
it can connect to a server, any server instantly because of it's ability to emulate (copy)
remote computers.
Lets Start:
In Windows, Telnet can be found by going to Start -> Run and then typing telnet.
The application should then pop up. If you don't have Windows, there are many Telnet alternatives for mac, linux etc. Since I don't know any,search the internet for Telnet for Linux or Telnet for Mac and you should find something instantly.
If you have a PC and are using Windows 98/95, 2000, Me, or XP continue...
As you can see, Telnet has 4 menu options. These are Connect, Edit, Terminal, and Help.
If you click Connect, you should see more options. Here they are.
Connect:
Remote System..
Disconnect
Exit
Names of servers you have been on.
To connect to a server, click Remote System...
This will then take you to a dialog box that has these fields:
Hostname:
Port:
TermType:
There should also be a Connect button and a Cancel Button.
Lets go over these & what you should put in them.
-Hostname-
The Hostname can be the address of the website your going to be connecting to:
http://www.google.com
or it can be the IP address. Keep in mind that you can only connect to servers and not to clients (other PCs)
an IP Address looks like this: 64.233.167.99
-Port-
Port can bb either the port number you wanna connect to on the server (Port 80 is the Internet, Port 23 is Simple Mail Protocol then there are some more ports for different things..)
or you can keep it Telnet and see what happens.
-TermType-
TermType is the type of Terminal telnet will be acting like.
This doesn't matter most of the time, so you can keep it to default or try other ones if you want.
When you have all this set up, you can Click Connect & see what happens.
Note: Sometimes many servers don't like anon people just logging on, so be careful when logging onto servers, because sometimes it might be some big company that likes bullying people or just SOMEONE who likes bullying people and then they might want to find you or trace you or something and I know for a fact you don't need that happening.
Another Note: When you go to a server and type something, such as a login name or a password, you might not see anything even though you are typing. this is a feature that telnet or the other server uses. It's for some kind of safety measure.
Ok that's all for the Connect Menu, lets go over the Terminal menu.
The terminal menu should have 3 options:
Prefernces
Start Logging
Stop Logging.
-Prefernces-
If you go to this, a dialog box will come up with various options. Here, you can change the
text color & background color of the program, and you can enable Local Echo, which shows
you everything you've typed, Blinking cursor if you want the cursor to blink check it, if not un check, Block cursor if you want the cursor to be shown as a block, VT100 Arrows, don't worry about these they are useless, Buffer Size, this allows you to set the number of lines of text you want to be shown before the screen starts to scroll, The Terminal emulation type, always have this set on the default unless you know what the second one is and you know what your doing.
-Start Logging-
This logs everything you do on Telnet in a log file on your computer.
-Stop Logging-
This will stop logging processes.
Well that's it for basics of telnet. Thanks for reading.
For complete Guide on telnet visit happy hackers guide for telnet, Telnet: the Number One Hacker Tool is the guide title, from this guide really you can become a hacker
Friday, 13 July 2012

Sunday, 8 July 2012
DNS VIRUS
DNS VIRUS
Be Aware Guys
Protect yourself from DNS Virus otherwise you will loose your net connection
To check your system whether it's infected by dns virus or not visit:-
http://www.dns-ok.us/
http://www.dcwg.org
The whole world will be affected by DNS Virus.DNS Virus will attack on tomorrow i.e 9th July 2012.
Approximately 10lakhs systems are affected by this Virus by which they are loosing their DNS.

Be Aware Guys
Protect yourself from DNS Virus otherwise you will loose your net connection
To check your system whether it's infected by dns virus or not visit:-
http://www.dns-ok.us/
http://www.dcwg.org
The whole world will be affected by DNS Virus.DNS Virus will attack on tomorrow i.e 9th July 2012.
Approximately 10lakhs systems are affected by this Virus by which they are loosing their DNS.

Sunday, 24 June 2012
What is I.P Versions

What are IP's? What is IPv4?
IP's are assigned to every device connected to the internet (computers, smartphones, etc..). Since 1977, the internet has been using the IPv4 standard convention, where ip's are numbered in a 32-bit system, which follows the xxx.xxx.xxx.xxx pattern (ie: 192.168.0.1). With each of the 4 numbers ranging from 0 to 254, the total internet ip address pool is capable of generating up to 4.3 billion possible addresses. As more and more devices connect online, the IPv4 infrastructure came under stressed and in 2012 most providers have officially depleted their IPv4 reserves.

What is IPv6?
To address the impending limitations of IPv4, the IPv6 standard was released. IPv6 features 340 undecillion ip's (340 followed by 36 zero's: 340,000,000,000,000,000,000,000,000,000,000,000,000). Unfortunately, adaption has been very slow and most ISP's have yet to take advantage of IPv6. The catch is that a user with an IPv6 address is limited to accessing websites and services that also have an IPv6 address (and that user will not be able to see IPv4 address's or websites).

Why should I care about IPv6?
If you get assigned an IPv6 ip from your provider, you are going to be stuck only being able to see only certain sites on the internet that are IPv6 enabled. On the flip-side, if your site isn't IPv6 enabled, you are going to lose customers who will be unable to reach your site!
How do I switch?
The best solution is to run your server and websites on both IPv4 and IPv6 in dual-compatibility mode. Unfortunately most internet service providers have yet to offer this kind of support - leaving users who have been switched to IPv6 in the dark (and costing your website visitors from those users!). T35 Hosting is proud to be one of the few hosts to start offering dual IPv4 and IPv6 support across all of our hosting plans. We expect to complete our IPv6 rollout to all accounts by the end of June, 2012.
Subscribe to:
Posts (Atom)